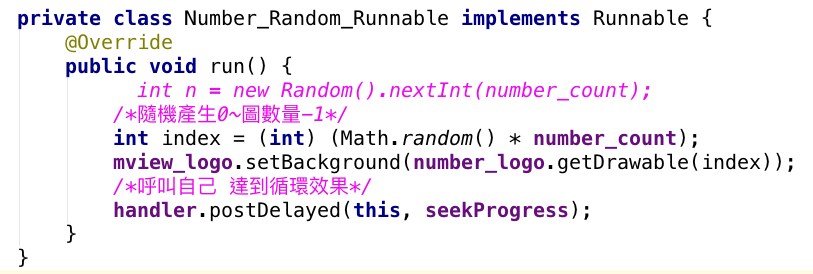
強大的事件處理「Intent」是Android很強大的一種機制
在Android應用程式框架中,有一個非常聰明得事件處理機制,稱之為「Intent」。Intent的作用跟事件(event)很相似,但與傳統的事件處理任然有些差異。傳統的處理事件,講求的是「處理者(handler)的觸發」,當一件事情發生時,便callback讓事件的處理者,或是直接將該事件轉送(forword)給應用程式,由應用程式決定處理方式。
在「Intent」這樣的事件處理觀念裡,Android試圖將事件解釋為「應用程式的意圖」或者「使用者的意圖」,並試著去解釋該意圖的目的,若Android系統本身能理解應用程式的意圖,便會「自行」去處理該意圖所應執行的工作。
Android的做法是,讓每個意圖(Intent)都帶有一個動作(action),並根據不同的的動作去行動。
(最近工作太忙碌...遲來的更新m(_ _)m)
關於Intent(意圖)

對於意圖這個說法 我更加喜歡用喚醒 來形容它所做的事..
實作Intent切換Activity
首先在 activity_main layout裡創建一個Button
<Buttonandroid:layout_width="wrap_content"android:layout_height="wrap_content"android:layout_above="@id/btn_edit"android:layout_centerHorizontal="true"android:text="點我選擇顏色"android:onClick="SelectColor"android:id="@+id/btn_color"/>利用好萊塢模式 onClick="SelectColor"
在MainActivity
public class MainActivity extends AppCompatActivity {
/*intent會用到的識別碼*/
private final static int SELECT_REQUEST = 0;
private final static int SELECT_EDIT=1;
private TextView result_text;
private int mcolorInt;
@Override protected void onCreate(Bundle savedInstanceState){
super.onCreate(savedInstanceState);
setContentView(R.layout.activity_main);
}
public void SelectColor(View view){
/*Intent需要能返回結果*/
startActivityForResult(new Intent(this,ColorPickActivity), SELECT_REQUEST);}
SELECT_REQUEST 宣告為 final static 是想讓這個reference 只有一個且值不被改變 而作為Intent裡面的識別碼
在MoveToNext 這個方法 其實也就是對應上面layout中Button裡宣告的onClick
Intent 也可以這樣宣告
/*從當前的Activity , 到目標的Activity*/
Intent intent = new Intent(this,Activity1.class);
/*確定回傳值是我們所要的,放入識別碼方便辨認*/
startActivityForResult(intent,SELECT_REQUEST);
其實短短的兩行就完成了 Intent的使用 這樣就可以進行切換Activity了
在切換Activity的同時 也希望將某些資料傳遞給下一個Activity 或者互相傳值
new 一個ColorPickActivity
layout:
<RelativeLayout xmlns:android="http://schemas.android.com/apk/res/android"
xmlns:tools="http://schemas.android.com/tools"
android:layout_width="match_parent"
android:layout_height="match_parent"
android:layout_margin="16dp"
    tools:context="apprestart.mylab07_2intent_.ColorPickActivity">

        <RadioGroup
android:layout_width="wrap_content"
android:layout_height="wrap_content"
android:layout_centerInParent="true"
            android:id="@+id/radio_rg">
            <RadioButton
android:layout_width="wrap_content"
android:layout_height="wrap_content"
android:id="@+id/radio_holo_red_light"
android:buttonTint="@android:color/holo_red_light"
android:text="holo_red_light"
android:checked="true"
android:onClick="clickColor"
android:textColor="@android:color/holo_red_light"
                android:textAppearance="@android:style/TextAppearance.Large"/>
            <RadioButton
android:layout_width="wrap_content"
android:layout_height="wrap_content"
android:id="@+id/radio_holo_orange_light"
android:buttonTint="@android:color/holo_orange_light"
android:text="holo_orange_light"
android:onClick="clickColor"
android:textColor="@android:color/holo_orange_light"
                android:textAppearance="@android:style/TextAppearance.Large"/>
            <RadioButton
android:layout_width="wrap_content"
android:layout_height="wrap_content"
android:id="@+id/radio_holo_blue_light"
android:buttonTint="@android:color/holo_blue_light"
android:text="holo_blue_light"
android:onClick="clickColor"
android:textColor="@android:color/holo_blue_light"
                android:textAppearance="@android:style/TextAppearance.Large"/>
            <RadioButton
android:layout_width="wrap_content"
android:layout_height="wrap_content"
android:id="@+id/radio_holo_green_dark"
android:buttonTint="@android:color/holo_green_dark"
android:text="holo_green_dark"
android:onClick="clickColor"
android:textColor="@android:color/holo_green_dark"
                android:textAppearance="@android:style/TextAppearance.Large"/>
            <RadioButton
android:layout_width="wrap_content"
android:layout_height="wrap_content"
android:id="@+id/radio_holo_purple"
android:buttonTint="@android:color/holo_purple"
android:text="holo_purple"
android:onClick="clickColor"
android:textColor="@android:color/holo_purple"
                android:textAppearance="@android:style/TextAppearance.Large"/>
        </RadioGroup>
        <Button
android:layout_width="wrap_content"
android:layout_height="wrap_content"
android:layout_alignStart="@+id/radio_rg"
android:layout_below="@id/radio_rg"
android:text="Cancle"
            android:onClick="SelectCancle"/>
        <Button
android:layout_width="wrap_content"
android:layout_height="wrap_content"
android:layout_below="@id/radio_rg"
android:layout_alignEnd="@id/radio_rg"
android:text="Ok"
            android:onClick="SeleckOk"/>
</RelativeLayout>
利用RadioGroup的好處是 在RadioGroup裡的RadioButton 會互斥達到單選效果。
ColorPickActivity:
public class ColorPickActivity extends AppCompatActivity {/*Key值 最佳實現方式,以app的package作為前綴詞*/
public final static String  BUNDLE_KEY_COLOR_INT="apprestart.mylab07_2intent_android.colorInt";
public final static String BUNDLE_KEY_COLOR_NAME="apprestart.mylab07_2intent_android.colorName";
private int mColorInt;
private CharSequence mColorName;
@Overrideprotected void onCreate(Bundle savedInstanceState) {
    super.onCreate(savedInstanceState);
    setContentView(R.layout.activity_color_pick);

    initColor();

}
/*初始化*/
public void initColor(){
    /*預設顏色為紅色*/
    RadioButton radioButton = (RadioButton) findViewById(R.id.radio_holo_red_light);
    /*取得按鈕顏色的值*/
    mColorInt = radioButton.getCurrentTextColor();
    /*將按鈕文字放入mColorName*/
    mColorName = radioButton.getText().toString();
}
/*點選RadioButton 每一個RadioButton都有宣告android:onClick:"clickColor"*/
public void clickColor(View view){
/*將View強轉成RadioButton 透過點選取得是哪一個RadioButton*/
    RadioButton radio = (RadioButton)view;
/*取得 android:text裡的字串*/
    mColorName = radio.getText().toString();
/*取得顏色的值*/
    mColorInt = radio.getCurrentTextColor();
}
   /*好萊塢模式*/
/*利用putEXtra將要傳送的資料放入putExtra(key值,value) 把它想成置物櫃想要拿到置物櫃裡的物品首先要對應的就是KeyKey對了才取得到值*/public void SeleckOk(View view){
    /*創建一個Intent的物件*/
    Intent intent = new Intent();
    intent.putExtra(BUNDLE_KEY_COLOR_INT,mColorInt);
    intent.putExtra(BUNDLE_KEY_COLOR_NAME,mColorName);
    /*設定有返回值*/
    setResult(RESULT_OK, intent);
    /*結束目前的Activity*/
    finish();
}
public void SelectCancle(View view){
    setResult(RESULT_CANCELED);
    finish();
}
由於一開始的MainActivity只有切換到ColorPickActivity 在ColorPickActivity選擇好顏色後
將選好顏色的值 傳回MainActivity 而MainActivity需要接收ColorPickActivity傳回來的值
我們只需要在MainActivity 多寫個方法即可
MainActivity
/*Android系統(好萊塢) 回報有結果*/@Overrideprotected void onActivityResult(int requestCode, int resultCode, Intent data) { super.onActivityResult(requestCode, resultCode, data); /*如果回傳的包裹裡的識別碼與我們當初定義的相同,這結果就是我們要的*/if (requestCode == SELECT_REQUEST){ if(resultCode ==RESULT_OK){ /*取得包裹*/ Bundle bundle = data.getExtras();/*從包裡取得值*/ mcolorInt = bundle.getInt(ColorPickActivity.BUNDLE_KEY_COLOR_INT); String colorName = bundle.getString(ColorPickActivity.BUNDLE_KEY_COLOR_NAME);/*將Color相關的資訊設定到TextView*/result_text = (TextView) findViewById(R.id.result_text); result_text.setText(colorName); result_text.setTextColor(mcolorInt); } } }執行結果: